How to DIY Individual Charcuterie Boxes for Parties
DIY individual charcuterie boxes are a great option for entertaining, especially on the go! They also make wonderful little gifts for your favorite foodies!
Ingredients
- containers, boxes (with or without lids), cups, cones, mini cutting boards
- treat bags or plastic wrap, to cover and protect ingredients for transport or display
- twine or ribbon, to decorate or help seal your containers
- charcuterie, select one or more depending on the size of your container
- cheese, select one or more depending on the size of your container
- crackers or bread, crostini, water crackers, herb/seed/nut/fruit crackers, flatbreads, breadsticks, etc.
- fruits + veg, like grapes, berries, figs; carrots, cucumber, radishes, etc.
- dips + spreads, like mustard, jam, honey, hummus, tapenade, etc.
- nuts + seeds, any variety of roasted, herb seasoned, spicy, sweet
- olives + pickles, any variety of olives; cornichons, sliced pickles or pickled vegetables
- sweets, like dried fruits, trail mix, chocolates, cookies or mini baked goods
- savory snacks, like potato chips, pretzels, sesame sticks, etc.
- garnishes, like fresh herbs or edible flowers
- utensils, like forks/picks, knives/spreaders, jars/ramekins, muffin liners (to keep gooey cheeses from running or prevent items from touching)
Instructions
For cups + cones:
- Individual charcuterie cups or cones require you to think vertically. They are also smaller and ideal as an appetizer course. Wooden skewers can be used to help build your ingredients up and create a lovely presentation.
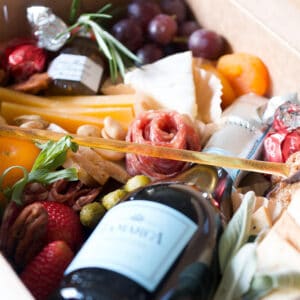
For boxes + mini boards:
- Start with larger items — place the largest items first. This will include things like a salami rose or river, groupings of cheese, a clump of grapes, a stack of crackers, or small containers of jams or spreads. Think about creating balance (not the same as symmetry).
- Fill in the gaps — begin filling in empty spaces with small or bite size pieces of fruits, like berries or dried fruits. Add small treats like chocolate truffles. Sprinkle in nuts and seeds throughout. Add longer objects like a honey stick or breadstick crackers, as well as disposable utensils, on top.
- Add the garnishes — finish by tucking in fresh herbs or edible flowers anywhere to create balance, movement or contrast.
Notes
- Store completed boxes in the refrigerator until it’s time to serve.
- If you plan to assemble a day in advance, use a wad of aluminum foil or parchment paper as a placeholder for crunchy items like crackers or pretzels so they don’t get too soggy in the humidity of your fridge. Simply swap them in before you set them out to display or transport.
Did You Make This Recipe?Be sure to share a comment below!